Friday, April 22, 2011

Confetti Eggs

When I was a kid my mom used to make confetti eggs for the Easter bunny to hide with the hardboiled eggs. It was, by far, my favorite thing about Easter (I'm not really a fan of Easter candy)! Here is how to make some for your kids.


First, take a raw egg and wash and dry it with soap and water. Next, with a pointed knife chip a hole in the shell. Try not to get shell in the hole. Once I get my hole started I stick the tip of the knife in it and pull up taking small pieces until the hole is large enough. (Can you tell that we have been dying eggs already?)


Then, turn the egg over, over a bowl, and chip a hole in the other side. This one doesn't have to be as big. Next, blow through the hole (this is why you washed with soap and water) you just made until the egg falls in the bowl. Then, I rinse the egg out by pouring a little soapy water in through the big hole while keeping my finger over the little hole. Then, I put my thumb over the big hole and give it a little shake. Next, remove your fingers from the holes and let the soapy water drain out. Then, rinse with water and prop it up on a paper towel and let dry. Since I don't want to waste the egg I do this over a few days when I make scrambled eggs for breakfast. Because I do it this way they don't get decorated until I have all the egg shells I intend to use. My mom just left them undecorated but I like the challenge of deciding which ones are the confetti eggs (they're lighter than hardboiled ones). This year I colored them using this method from Pink and Green Mama. I just put a small piece of tape over the holes so the color didn't get inside. Last year I put tape over the holes and put them in the same dye cups I used for the hardboiled eggs but they float so I had to figure out how to weigh them down. This year's method worked much better.


Once I had the egg shells decorated I glued a square of tissue paper over the small hole.


Then, through the larger hole, I stuck paper confetti in. This part takes a little patience. If you make your hole large enough you can use a funnel and pour the confetti in, however, I always get the confetti stuck in the funnel. I find it easier to just gently push small pinches in.


Once you have the shell filled glue another square of tissue paper over the large hole and you're finished! When your kids find them they can surprise each other by breaking them on each other. Just a tip though, it can hurt when these get broken on heads! My rule for the princesses is that you break them against shoulders only. When they're older they will be able to crush them in their hands over each others heads.

Crafting For Charity

A couple of months ago Queen Sallie turned me on to a blog called Craft Hope just as they were finishing their current campaign. I have been eagerly waiting for the next one to start and it finally did! Well, after reading this post from I can teach my child I decided my princesses are getting old enough to learn it's not all about them and the Craft Hope project was a perfect fit. We started by discussing the orphans in Russia and other places around the world and here in the USA. First, I gave them a definition for the word orphan. Because I'm not ready for them to think about King Daddy and I dying, I explained that sometimes mommies and daddies can't make enough money to take care of their children so they give them to the orphanage so that they will have enough to eat, a place to sleep and clothes to wear. Now, I realize that this isn't always the case but please remember that this discussion is for a 3.5 and 5 year old and they don't need to know the entire ugly truth, yet. After our talk we went to the craft store to get some supplies.


We got some 2mm elastic cord that is rainbow colored and a 1lb container of pony beads.


Once we got home I tied a piece of yarn to a large wooded bead, both out of our stash. Then, I taped the end so that the yarn wouldn't unravel with repeated use.


Then, I gave them the supplies and let them go to town. Princess Big was all about the patterns. Princess Little just strung whatever she picked up next.


Once their string was full they brought it to me and I transfered it to the elastic cord and tied it in a knot. This activity kept them busy for about 2 hours! I don't know about your little ones but in this house it's unheard of.


When King Daddy got home from work I explained what we were doing and what we had discussed. He was so proud of his princesses that he decided to get in on it too :)

I am planning on making some fabric bracelets too. When I do I'll be sure to do a post so keep your eye out.

Thursday, April 14, 2011

Silhouettes

When making the benches for my fabric storage I ended up with two scrap boards that were about 12" X 10". Instead of letting them take up space in the garage I decided to use them for a piece of art. 


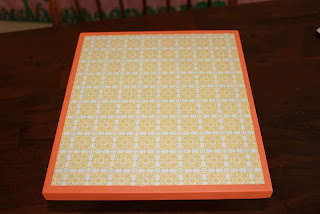
Before collecting my other supplies I sanded the wood. I started with a course (60) grit and went over both flat sides and all four edges. Then, I moved on to a finer (100) grit. Then, a finer (150) grit and finally the finest (220) grit that I had. Next, I chose the scrapbook paper I wanted to use. Once the paper was chosen, I picked a coordinating color of acrylic craft paint and painted the edges and about 1" of the flat surface.


After that, I traced the wood on the front of the paper. Using the tracing I cut the paper about 3/8" smaller on all four sides. Then, I used Mod Podge to glue it to the board. You can see how I ended up with an orange frame around the paper. You could make it larger, smaller or none at all if you want. Once it dried I gave the entire thing (except the back) two coats of Mod Podge and let it dry.


While the boards were drying I snapped these pictures of the princesses in profile and printed them out on regular copy paper in 8" X 10".


Next, I cut out just the head making sure I got as much of the detail as I could. After that I scanned them back into my computer. I put them on the tray with the back/white side down and put a piece of black paper on top. This way I could move it into my Silhouette cutting machine. After getting all the cut lines set I cut the silhouettes out of black adhesive vinyl. If you don't have one just print your picture on a piece of cardstock and cut it out to use as a template. You may need to enlarge or reduce it to get the right size. Once your template is set just trace it onto a piece of black paper or a sheet of vinyl that you can buy at the craft store near the cutting machine accessories. 


Once the Mod Podge was dry I stuck the vinyl silhouettes on. They turned out better than I thought! The vinyl  was surprisingly easy to work with and I can't wait to do more with it. 

Fabric Storage

When we moved from Texas, 4 years ago this summer, my fabric stash wouldn't fit in the truck. King Daddy asked if it was okay to give it away. I didn't really want to but I didn't have much of a choice. I agreed but told him he was going to pay for it. He thought I meant emotionally but actually I meant monetarily. I seriously had over $1000 of fabric in that stash! Over the last 4 years I have slowly been accumulating more fabric and it is time to store it in a way that I can see what I have. King Daddy isn't sure he agrees but it will actually save him money. I won't be buying fabric if I already have some that works!


Here is the mess that I started with. I had fabric stashed in several different boxes. I couldn't see everything and I didn't want to go through each box to see what I had. It is really so much easier just to buy more ;)


I started by making two benches like this. When the Princesses are older I intend to put an upholstered top on it and use it as maybe an end of bed bench. Anyway, I digress. I used this plan by Ana White as my guide. I only used step one and two and I changed the measurements a little. Each cubbie is about 16" X 11".  Then I used this plan by Ana White as my guide to make a 16 cubbie shelf system. Again I changed the measurements a little. I used 8" boards and my cubbies are about
 8" X 8".


Here is the finished product. All my fabric is now clearly visible. I love it!

Tuesday, April 12, 2011

Paper Towel Substitute

"I'm back baby"!
If you do not watch Futurama, I am sorry for that reference, if you do high five!

A quick recap:
I am Sallie.
Even though I try really really hard my sewing machine and I have a love/hate relationship.
I am a big fan of simple projects that pack a big punch.


I have been trying for several years to rid our house of paper towels or at least cut down drastically on the amount we use. We use cloth kitchen towels as napkins but still have
a paper towel roll around for spills and messes. I never wanted to cross contaminate
the napkins (for hands and faces) with the chicken juice towel (ick), so I never used
the kitchen towels for spills. Now with a toddler running around I feel like I go
through a roll of paper towels a day, that may be a slight exaggeration.
Here is my solution to the paper towel conundrum.

Paper Towel Substitute


What you will need:
Paper towel holder - I used our existing one
Paint Roller/Stiff cardboard tube
Micro Fiber cloths
Velcro
Sewing machine/thread

I purchased a couple of three packs of micro fiber cloths from Lowe's for about $4.00 each.
I also used some Trader Joe's Kitchen Cloths, they were about $3.00 for two.
Both of these absorb a ton of liquid and can be thrown in the washing machine and dryer, however they should only be dried on low heat.

The paint roll fits snuggly onto my paper towel holder, it is too tight to spin but still works fine. An alternative would be to use a stiff cardboard tube and glue velcro to it.

I cut all of the towels and cloths in half and hemmed the cut edges.

After unraveling my ball-o-velcro (sad, I know) I pinned two pieces on each towel.
A female piece on the top side and a male piece on the opposite underneath side.
Then I sewed them, with only minimal sewing machine outrage.

Velcro all of your towels to each other and wrap around the paint roller.


They are not as tall as normal paper towels but they hold a lot more liquid and take up the same space. I use them and then toss them in the washing machine. A great way to not only save money but also be a little nicer to our planet. It really is the little things!

I can not thank Craftin' Texan enough, not only for letting me post
but also for sparking my creativity.

Thursday, April 7, 2011

Cardboard Playhouse

Hello to all of you out there in blogland! I know it's been a while since I've posted but I assure you I have not been idle :) I have been working on several projects and I finally have one finished to share, it's my cardboard playhouse. King Daddy's parents got a new double oven for their kitchen and asked me if I wanted the box. As I'm sure you've all guessed, I said YES! Here is how I transformed it from an ordinary (my kids favorite new word) box into a fabulous new playhouse.


Here's the box we started with. It's huge!


To start with I opened it up along the seam.


Next, I measured out windows on the two middle panels and cut them on three sides. My idea was to turn these flaps into awnings.


After cutting the windows, I laid the box flat on my dining room table and gave it two coats of white acrylic craft paint to hide the printing on the box.


The princesses just saw "Tangled" so they wanted to paint it the same color as Rapunzel's tower. I didn't have any purple tempera paint so I mixed a metallic blue and plain red. Here it is after two coats. The picture's not great so you really can't see that it didn't turn out quite the right shade.

  
That didn't matter. Once the purple was dry I mixed up a rosy shade with metallic red and white and gave it one coat over the purple. Again, the photo's not great but I finally had a color we could all agree on.


Once the "outside" paint was dry I painted the "inside" with two coats of chalkboard paint. I let that dry for a day or two and then primed it with the side of a piece of chalk. That way it can be a house with furniture or a grocery store or a cafe or whatever their imaginations come up with.


Next came the curtains. Queen Sallie sent me a box of fabric that she deemed too girlie for her house of boys. I couldn't be more pleased! There was plenty of fabric to choose from and Princess Little chose a white fabric with little bouquets of purple flowers. I also used some purple fabric left over from our quilt for the valance. To put it together I stapled the fabric to one side of a rectangle of cardboard that is slightly larger than the window.


Next, I cut a length of the white fabric a few inches longer than the window. I cut it in half and hemmed one side (I didn't have to cut off the selvage so I didn't have to hem that side) and the bottom of each panel. Then I stapled it to the cardboard adding little pleats as I went.


Then, I brought the purple fabric around and glued it (the staples went all the way through cardboard I used and I didn't want them to show). Then, I glued the sides too.


After letting the glue dry overnight I used my glue gun to attach them to the playhouse over the windows. I then used a piece of purple grosgrain ribbon to tie them back.


Now it's time to prop those windows up! To do this I cut five strips of cardboard. One of them is about four inches longer than the other four. The longest one went on the bottom and then I glued the other four on top of one another with the hot glue gun.


Using Mod Podge, I covered the middle with white paper. I thought about painting it to match the outside of the house but I decided I liked the white accent. I also didn't think I could get the paint exactly the same since I did so much mixing.


See those blue dots? They are a fabulous little product I found (review post to follow) to attach the supports to the window.


I think the windows and their awnings turned out great!


The final, for now, detail was some flowers growing around the outside of the house. Queen Sallie convinced King Daddy to get me a Silhouette for my birthday (way to go Queen Sallie!) I used it to cut these flowers.


I cut each layer out of a different pattered/solid paper in smaller and smaller sizes. Then, I glued them together in the center of each layer. Next, I glued a button to the center of the top layer. Once it was all dry I folded each petal up to give it depth. Lastly, I used a glue gun to glue them to the box.

I hope this has inspired you to turn "trash" into something beautiful for your kids!