Sunday, March 20, 2011

Board Book Revamp

Do you have a ratty old board book your kids destroyed? Not so much that it can't have a new life, but too much to pass it along to another baby. It seems like that's all I have :) Well maybe you could turn it into something like this.


I have to admit that this is not originally my idea. The problem is that I can't remember who's blog I saw this on. If you have happened upon this blog and recognize your work please send me an email so I can credit you! Since I can't send the rest of you to that blog I will show you how I put mine together.


I started with this ratty old board book my princesses picked to pieces.


I left the first three pages and last two pages alone. All the rest of the pages I cut the centers out of. I left a boarder of about 1 inch. 


Next, I chose some corresponding scrapbook paper and cut one piece to go over the spine and glued it down with Mod Podge.


Then, I glued a piece to the front and back and tucked it around to the inside. After that I glued the first two pages together and all of the cut pages to the end.


Once the glue was dry I painted the whole pages with chalkboard paint and let them dry. Then, I painted the cut out pages and the sides with acrylic craft paint. When that was dry I gave the pink paint two generous coats of Mod Podge.


I found a small screw in the hardware box in the garage and tied a length of very thin pink ribbon (from our stash) just under the head. Then, I just screwed it in, the pages are soft enough. After this step I gave the entire outside two generous coats of Mod Podge.


Once it was dry I found one large button and one smaller button (think hubby's button down shirt). I used super glue to glue them together and then I glued them to the front of the book.


The only thing left was to cut a couple squares of scrap felt and find some chalk pieces. Now I can drop it in my purse and the princesses can play tic-tac-toe or draw when we have to wait for something.

Tuesday, March 8, 2011

T-Shirt Headband

Hi, I am Queen Sallie.
Craftin' Texan is kind enough to allow me to hijack her blog and I am grateful.

A few things you should know about me:
I have a wonderful family
I curse at my sewing machine on a daily basis
It took me 4.5 years to make my godchild's baby blanket and I sewed half of it on backwards
Once I sewed straight through my finger, really freaked out the hubby on that one.
I have a Silhouette, not that it is important just really cool and I hope to add different tutorials on how to use it in every day projects.

After all of that why would you, lovely blog reader, want to follow any sewing advice I put out there? Every project I have attempted I have learned a great deal from, even something as simple as sewing a straight line (I am about 75% successful on most days). That means if I can do it, anyone can. Hopefully through my missteps and follies I can help you also sew a straight line, which is all the sewing you will need to do for this t-shirt headband.


T-Shirt Headband


(My lovely son modeling the finished headband.)

Supplies you will need:

old t-shirt
scissors
sewing machine/thread
embellishments - Silhouette Heat Transfer Material


Cut straight across the body of your t-shirt to make strips. My headband ended up about 2 inches wide but you can make yours any size. I had enough material to make 5 headbands total.

Cut a strip so you have a long piece of material. I just wrapped the strip around my head and pinched at the base of my neck, this is where I sewed. You can use an actual measuring tape to do this step as well.


Curse at your sewing machine when it eats your material.


Cut off the excess material and flip inside out.


Now your seam is on the inside.


I used the Silhouette I received for Christmas to do the embellishing on the headbands. It is an amazing crafting tool and fairly easy to use. I picked a design I liked from the on-line store (although you can create your own designs) and cut it out using the Heat Transfer Material. Cut your design off of the roll and peel the negative space off of the clear sticky side. Place it down on your headband, cover with a cloth and iron.


Peel back the clear material, if the Heat Transfer Material does not stick cover and iron again. DONE!

I also made a couple for St. Patrick's Day...my favorite holiday!


While writing this post I came across Craft Snobs headband tutorial found HERE.
She is far more talented than I am (I love her cuff bracelets)
and used fabric flowers to decorate hers.


Do not throw away the hem of your t-shirt! You can make a double headband in one easy step. Make a circle with your hem and sew a line at the end.
Ta Da...done!


I couldn't get the kid to sit still long enough to model so I used Mr. Pig!


Again, a big THANK YOU to Craftin' Texan for letting me post.
I am busy working on a couple of "green" ideas for our family
and hope to post those in the near future.

XL Building Blocks

When Princess Big was a baby King Daddy found these really cool large cardboard building blocks in one of those boutique toy stores. The problem was that she was too little to play with them and they were really expensive! By the time she was old enough we had moved from that city and I completely forgot about them. That is until I stumbled upon this project at Vintage Image Craft. The vintage look really isn't my style but it made me remember the cardboard blocks and here's what I did.


I started with an empty half gallon milk carton and just popped the spout off. They peel right off if you stick a knife in under the plastic.


Next, I cut the corners.


Then, I used my glue gun to glue the flap down.


Once the glue was dry I noticed that the sides popped up a little. So, I put a drop of glue right in the center there and glued it down on both sides.


Next, just like the guys at Vintage Image Craft, I covered the cartons with newspaper dipped in liquid starch. Then, I set them to dry on toothpicks stuck in a piece of Styrofoam. I did that twice. Once the second layer was dry I used acrylic craft paint (2-3 coats) to give them that brick red color.


Here you have it! I only have 3 blocks right now. I wanted to make sure the process would work first. Now that I'm satisfied that it does, we need to drink more milk!

Saturday, March 5, 2011

Entry Hall Finished

I now have my entry hall finished! The last piece was a shelf to go over the coat rack with a few "baskets" to hold the winter hats and gloves/mittens.


I didn't make this a tutorial because I didn't really come up with this design myself. Instead I modified a design by Ana-White. You can get the original plans from her website here. The differences with mine are that I didn't put the overhanging top piece on and my coat rack is not attached (I already had that in place). In this picture it looks like the shelf is wider than the coat rack but that's just shadow, it's exactly the same width (there's a first time for everything).

The "baskets" are actually just a cardboard box (maybe I should change my name to Cardboard Queen) that I resized into 3 smaller boxes and covered using this method from Positively Splendid (and it is).

Oh, I also had King Daddy help me hang the art piece!


Here is Princess Big giving the new entry hall bench a try.  I said I was finished but maybe some new door mats....hmmm.

Thursday, March 3, 2011

Entry Hall Art

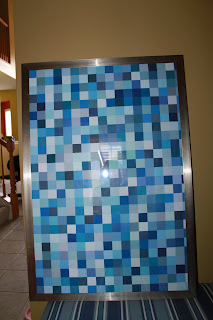
If you've ever been to my home you know I'm not much of a decorator. First off I'm kind of a minimalist and second I just don't know what I'm doing! However, after getting the bench in my entry hall I was kind of encouraged to "finish" the space. I talked myself into it telling myself that it was a nice small area. I'm in the middle of another building project for our hats, gloves, etc. So, while waiting for the paint to dry on that I made this art piece.


I will be hanging it but I want to wait until I have the hat shelf on the wall first so that I can get the visual right. I also need King Daddy's help to hang it.

I think I first saw this idea at Mod Podge Rocks but when I went back looking for it I couldn't find it. I blame being sick. When I Googled "Paint chip mosaic" I found lots of examples so I'll just tell you how I did mine.


First, I went to Lowe's and Home Depot and got one of every paint chip in the color blue. Then, I sat down with my 1.5 inch square hole punch and punched out as many squares as I could. I already had the poster frame and I always keep the 'picture' that comes in frames. I just turn them around and put them behind whatever picture I'm putting in the frame. So, I took the "picture" which was a piece of thin cardboard (think cereal box cardboard) and started gluing my squares on. I used Mod Podge and a 1" foam brush to put one thin swipe down the center of each square. Since I was putting the finished product in a frame I didn't put a coat of Mod Podge on top (I think I would have, though, if I wasn't using a frame). After letting it dry I slid it in the frame at that was that!

Tuesday, March 1, 2011

New Blog Author

Hi to all of you out there that read my blog! I have some exciting news! One of my very good friends, Queen Sallie (you may remember her name popping up in past posts), is going to start contributing to this blog from time to time. She got a new crafting toy for Christmas and I can't wait to see how it works and what she does with it! So, welcome Sallie.