Thursday, December 9, 2010

Cardboard Washer and Dryer

Last month I made a post about a cardboard washing machine. I went to check on Princess Little upstairs and discovered her using her training potty as a washing machine for her doll clothes. Gross! So I told her we could make her one from a cardboard box. I was feeling a little under the weather that day and I just used a sharpie to draw the buttons on the front. I wasn't sure I could paint it because of the tape holding the box closed and I was at a loss on what to do. Well, my friend, Queen Sallie (from a kingdom far, far away) suggested I cover it with contact paper. Her idea was nothing less than brilliant! Fast forward about two weeks...I should have seen it coming...Princess Big put water in the washing machine! Needless to say, it was ruined. Oh well, it gave me an excuse to make a matching washer and dryer.


I started by taping the box closed and then wrapped it in contact paper. I used a small mixing bowl to trace a circle on the front. Then I used an X-Acto knife to cut it out leaving about 1/3 of the circle so they would open like the doors of my machine. I have a front loading machine and Princess Little wanted it to look just like mine.


Next, I used a piece of cardstock and paint pens to make the different cycles and times. Using rubber cement I glued the labels onto the boxes. When the glue was dry I used my knife again to cut a small x in the center of each one.


At Hobby Lobby I found these wooden toy wheels that are about 2 inches in diameter. I used the paint pen to draw the black pointer on the smooth side. At the hardware store I got these #10 1inch nut and bolt. Then I stuck the bolt through the wheel and then through the small x in the box. After that I screwed the nut on with my hand. Not too tight so that the wheel would spin easily. For the door handle, I used another wheel but this time I flipped it over and attached it in the same way as the others. I did tighten the handle more so that it wouldn't spin.


Here you go! A matching washer/dryer. If only they could wash their own clothes...

Wednesday, December 8, 2010

Stained Glass Ornaments

Here is the end result of our recent crayon melt pictures, finally!


The first step was cutting out the frames and "glass". I used these stencils but you could cut them in any shape you want. I used the largest and smallest square/circle in the right column for the frame. For the "glass" I used the one in the middle. Make sure you cut out two frame pieces for each piece of "glass"


Next, the princesses put a trail of glue around the frame.


Then, they smeared the glue around to make sure the entire frame was covered.


After that, we laid the "glass"down. Just a note, if there is a lot of glue the velum will begin to curl up so you may need to go quickly or help you little one with the next step.


Next, just lay the other frame on top and press along all of the edges to make sure they stick together.


Here are our glued ornaments drying on a piece of wax paper.


Once they were dry (after the princesses went to bed) I used a hole punch to make a hole in each one.


Then, I used some curling ribbon that I had on hand to make a loop.


I added the date to the back and some ornament hangers so the princesses could hang them in the morning.


Here they are looking for just the right spot to hang. We were looking for spots right in front of lights so that they would "glow" when the tree lights are on.


I think it worked out pretty well!
This year the princesses are getting a "divorced parents" kind of Christmas. King Daddy's parents will be visiting the cousins this year so we did our present opening with them this past weekend. It turned out great because we also had our first "big" snow (about 4 inches). It was perfect for snowballs and snowmen. For those of you in the south that may not know, our snow us usually too dry to stick together for that kind of thing. While the others were down in the basement wrapping presents I took the princesses out to play. I'm sorry I don't have any pictures of us making snow angels and throwing snowballs. I didn't think the camera could handle being out in the cold and snow and King Daddy was busy. I did however get a picture of the snowman we built. I grew up in the south and had no idea how hard it was to build a snowman! It really takes a lot out of you and this guy is only about 3 feet tall!


Presenting Mr. Snow! Can you believe this picture was taken at 4pm? It really didn't seem like it was that dark.

Saturday, December 4, 2010

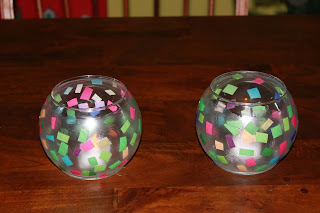
Candle Holders

Last night we made some candle holders for the dining room table. I got the idea for this from Pinkandgreenmama@blogspot.com.


Here are the materials:
Glass candle holders (I got ours at the Dollar Tree)
Mod Podge
Foam craft brush
Tissue paper


First, we painted a thick layer of mod podge over our entire candle holder. You can't see it in these picture but there is a piece of wax paper under the candle holder. The project will easily peel off the wax paper when dry.


Next, we stuck pieces of tissue paper on the candle holder.


Before letting them dry, Queen Mommy put a thin coat of mod podge over the whole thing, just to make sure the tissue is sealed in.


Once dry put a votive or tea light in. I used flameless tea lights that I got at the Dollar Tree. 

Thursday, December 2, 2010

Cardboard Puppet Theater

This past summer I made a puppet theater for the princesses out of a cardboard box. I didn't have this blog up and going so I didn't take step by step pictures, sorry. The only pictures I have are of the finished product but hopefully you'll get the idea as I explain what I did.

I started with a Grand Wardrobe Box from U-Haul. The dimensions are 24" x 21" x 48".


The first thing I did was to cut off all of the top flaps (I did not cut off the bottom flaps). If you look at the picture of the box on the U-Haul website you'll see that one of the flaps on one of the narrow sides is longer than the rest. After that I cut a straight line all the way down the box and through the bottom flap.


Next I laid the box out flat and cut a hole 30" x 14" about 81/2" from the top. After that I got down to painting.The first two coats were just white acrylic craft paint so that the printing on the box wouldn't show through. Next I painted the sides in a metallic blue tempera paint with 2 or 3 coats. The center panel I painted with chalkboard paint so the princesses could write the name of their show on it. So that the boarders of the chalkboard wouldn't show I hot glued a strip of sequenced trim I got from the fabric store. I had hopes that the light shinning off the sequence would look like light bulbs around a marquis.


Next I made some curtains out of scrap fabric I had on hand. Instead of a hem around the sides and bottom I used double folded bias tape and just sewed it around. Once that was on I turned the top down and made a seam big enough to insert the dowel rod I purchased, which I believe was a 3/8", from Home Depot. I got the smallest size that didn't bend easily.


When the curtains were ready I put them on the dowel rod and used a knife to get a hole started so that I could push the dowel through. Then to secure it on the outside of each end I screwed on a nut, purchased at the same time as the dowel rod. I just took the dowel to the hardware section and tried different sized until I found the one that would screw on. As I twisted them on they made the grooves necessary. Note: I used a soft wood dowel, I think it is poplar. I'm not sure how easy this would have been with the oak dowel.


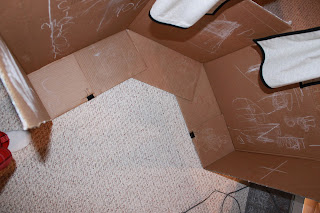
 Once it was all finished I used binding clips I had on hand to secure the cut back flaps down to the side flaps. As you can see the inside of the box serves as a board for play notes :) They can be erased with a chalkboard eraser but they don't come off quite as neatly as they do on the chalkboard paint. That might be an upgrade for me, to paint the inside with the chalkboard paint also. 


We had a few puppets already but I have also made more out of felt. Felt is great because you don't have to finish the edges and once you sew the sides together you can just use fabric glue to attach the details. As soon as I can figure out how to put a template up I'll do it for the basic shape of the puppet and then you can let your creativity take off!