Monday, February 28, 2011

Entry Hall Bench

Well it's only taken a year and a half but I finally have a bench in my entry hall. We don't wear shoes in our house and my entry hall was a mess of shoes! We also had to sit on the stairs to get our shoes on and off and King Daddy and I are getting old and creaky and it just wasn't working!


 I know I took a picture of just the mess but I can't find it now. If you look past the Princesses modeling their gear you can see the absolute mess of our shoes.


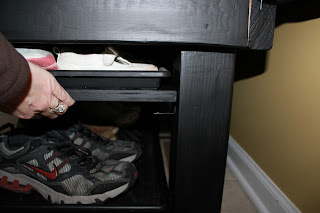
Here is the finished bench with our shoes neatly tucked away underneath :)

I came up with idea on my own but after participating in the Build {hers} Club post over at Sawdust and Paper Scraps I discovered I was not as brilliant as I thought. There was a post for a Traditional Outdoor Bench which had essentially the same design as mine. Instead of giving you a play by play on how I built mine I'll just give you the link to theirs (it's much more detailed anyway). So, if you go over to http://www.betteroutdoorlivingathome.com you can get the instructions here. There are a couple of differences. First, instead of slats, I just used a 1/2" piece of plywood as the top. I just screwed it to the frame and then upholstered it. Second, I added shelves.


To add the shelves I screwed these L brackets into the legs and slid a piece of painted plywood in as a shelf. Now that I see this picture I think I need to take a fine paintbrush to the "crack" where the 2x4's meet. I wondered about that while I was painting, oh well :) It's a learning process!

Thursday, February 24, 2011

Let's Go Fishing

Queen Mommy has been busy this week working on an entry hall bench (more on that later) and the quilt the Princesses designed (more on that later too). Add to that Princess Big got sick with something and had a fever. Needless to say, we didn't do any crafting together. This had me feeling guilty so I whipped up this little game for the Princesses last night while watching American Idol (I know). It's a little fishing game that I've seen all over the web but here's how I did it.


First, I made a fish template out of cardstock. Then, I traced it onto cardstock of different colors and cut them out. Next, I laid out a piece of clear contact paper and put a paper clip down under one of the fish cutouts. Then, I put another piece of contact paper over the top and cut all of the fish out again. You could just cut out the paper fish and put the paper clip on but I wanted something a little more sturdy.


To make the pole I took a piece of dowel rod that I had left over from my Quilted Sunnies Caddie. Then, I tied a length of string (I used cooking twine) to the end of the stick and ran my glue gun around it so it wouldn't slide off the end. Next, I tied the other end of the twine to a craft magnet and ran my glue gun around and under the knot to hold it to the magnet.


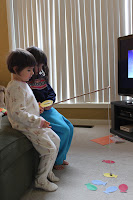
Here are the Princesses fishing. It has kept them pretty busy for the better part of an hour so far :) Time Queen Mommy used to put a first coat of paint on her entry hall bench!


Friday, February 18, 2011

Build {Hers} Club

Hello everyone out there! I'm so excited to be joining in the Build {Hers} Club over at Sawdust and Paper Scraps. To join in or just check it out go here.

My contribution is the beds I made for my Princesses. Okay King Daddy helped a little. We joke, however, that when I'm building something he is the manual laborer. Since I don't have the best tools for the job or the best set up to use the ones I have, his job is mostly to hold the sheets of wood while I cut and sand them and to move heavy pieces around.


Here are the finished beds for both Princess Big and Princess Little.


To start with I built a frame. For Princess Big I used 2x6's and 3" screws. For Princess Little I used 2x4's. The platform is a 1/4" sheet of plywood.


The headboard and foot board, as well as, the sides were made from 3/4" plywood. The headboard and foot board are essentially rectangles with the top corners rounded off. After getting the pieces cut and sanded I upholstered them.


Then, I attached them with these L brackets in all four corners.

The whole process took about 2 days.

Monday, February 14, 2011

Valentine's For My Princesses

Here is what I did for my special valentines for Valentine's day.


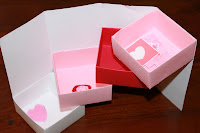
First I made this little treat box for the Princesses. You can see how I did it here at Life As Lou.


 In the top box I put some home made lick and stick stickers. You can see how to do it here at I can teach my child. 


The second box had a tiny heart barrette. You can see how to do it here at The Purl Bee. The third box had one of those washcloth bricks (you know the ones that are the size of a silver dollar in the package and when you put it in water it puffs out to a full size washcloth) from the dollar store and the last box had candy in it. King Daddy added a fancy ring and a tongue scrapper (I know it doesn't sound very Valentine'sy but the Princesses are very into dental hygiene right now).

Valentin's Day Frames

Last week the Princesses and I spent time crafting for Valentine's day.

 I found some wood frames at the dollar store (later I saw some at Michael's that were also $1) that I brought home and painted white with acrylic craft paint.


While the paint was drying I made these heart stamps. I just took an X-Acto knife to the unused eraser of some pencils I had. It was surprisingly easy, like a warm knife through butter easy!


Then, I gave the Princesses a bit of red acrylic craft paint and a stamp and let them go to it. After letting the red dry I gave them some pink and let them at it again.


Last but not least we took this picture. I just pinned a piece of pink fleece, from my sewing stash, to the wall. I used a toy box under the piece on the floor for Princess Little to sit on. They are wearing shirts that I painted with fabric paint. I cut a heart stencil out of cardstock and taped it to the front of the shirt. Then, I squeezed some paint and spread it around with a foam brush. Once it was all dry I wrote "Love". I really hope Mimi, Granddaddy and Grandma get their package before reading this :)

Monday, February 7, 2011

Q is for Quilt

Last week we learned about Q for quilt. Queen Mommy loves to quilt. In fact, I have already made matching reversible quilts for the Princesses' beds (which King Daddy and I built).


I would love to pass on my love of quilt making to, at least one of, the Princesses. So, I decided to have them make paper quilt squares that I will then use to create a throw for the family room. I started Monday sitting with the Princesses and looking at quilting books and magazines. Then I gave them construction paper and scissors and let them go to it.


Well, I discovered quickly that THAT wasn't going to work. They decided it was just an invitation to cut paper. It was a huge mess! There were little scraps of paper all over the table, chairs and floor.


I started Tuesday by giving them squares and triangles in a few different sizes. That worked much better!


I showed them how they could use the shapes to make pictures.


Here are some that Princess Little came up with.


Here is one that Princess Big came up with.


The next thing I did was to map out our blocks on a throw size piece of paper (I ran out of bulletin board paper so I just taped together regular copy paper). You can't really see it but each color is already labeled with the cut size of the fabric. Now all I have to do is add up the cut sizes so I know how much fabric to buy. I know the middle looks blank but we do have an idea for it. This quilt tells the story of the things we love and one of those things is ballet. I don't know how to make a ballerina quilt block in the same way we made the others. She just wouldn't come out looking as graceful as she should! Instead we are going to try to find some fabric with ballerinas in different poses. Then I will create shadow box squares highlighting them. Stay tuned to see how it turns out!