Monday, May 16, 2011

Drawer Pulls

The next piece of furniture to get a makeover was my bedside table. I started by sanding, priming and painting it white.


This is the original drawer pull. I knew I wanted something different that matched my new blue and white color scheme. After looking at many pulls online I couldn't find one that had a 2" screw placement that I liked and could afford (I have another dresser to do and I want them all to match). I decided I could make my own.


I bought some balsa wood strips from the craft store. I used a 3/16"x3/8" piece that I cut to 3" for the base. For the sides I used a 1/16"x1/4" piece. I cut two small pieces for the ends and then two pieces for the sides. I attached them together with wood glue and let them dry.


Next, I used a 3/8' dowel and using a 1/8" drill bit (this is the size bit to make a pilot hole for a #8 wood screw), made a hole in the center. Then, I cut two pieces 1/2" long. To get the placing correct for gluing them on I screwed them into the drawer, added a little glue and let them dry.


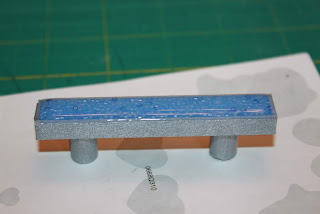
After all the glue was dry I painted it with metallic silver acrylic craft paint and let it dry. Next came the bling. I poured some glass seed beads into the tray and then covered them with some Mod-Podge Dimensional Magic and let it dry.


Once dry I screwed it into place. After that I gave it a try and the pull came off the dowel pieces. Maybe I didn't use enough wood glue. No big deal, I pulled out some super glue and it hasn't come off again! For the price of two pulls I loved online (~$20) I can make 15 pulls!

Dresser Cover

The first piece of furniture to get a makeover was the dresser.


It was the one King Daddy grew up with and his parents had it refinished. Needless to say it holds sentimental memories for King Daddy and he didn't want me to touch it with any paint. In fact he asked me to make a cover for it so it doesn't get scratched. 


The first thing I did was measure the top and cut a piece of fusible fleece. You can find it in the fabric store with all the fusible interfacing and such. Then I measured the top from underneath the overhang across the top and underneath the other overhang (and front to back). To that measurement I added two inches on both the length and width. 


After cutting the fabric I ironed a 1/4" fold then a 3/4" fold and pinned it. Then, by hand, I sewed the corners down. Once that was done, I sewed around the inside edge, leaving a few inches open, to form a casing for the 1/2" elastic.


After sewing the casing I centered the fleece inside it and ironed it to the wrong side of the fabric per the instructions that came with the fleece. 


Once the fleece was on I measured around the dresser and used about 1.5' to 2' less elastic than the measurement. The elastic I had was very stretchy and I wanted the cover to be snug so the drawers wouldn't get caught in it. I pinned a safety pin to the end and pushed it through the casing all the way around. Then, I overlapped the ends about an inch and sewed it together. 


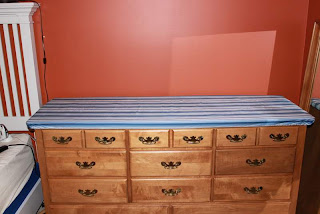
Once I got the elastic all spread out evenly I sewed the opening closed and slipped it on the dresser. It turned out much better than I thought it would. It fits the top perfectly and the drawers don't get caught at all. They also close all the way without getting any cover closed in them. I couldn't be happier and King Daddy thinks it's perfect!

New Bed

Well King Daddy and I finally did it. We got ourselves a new king size bed! We've been talking about for quite a while now and we finally saved up enough money to do it. We went with an organic natural latex mattress that requires a special kind of box spring or a slat bed frame. We didn't get the box spring because originally I was going to build a slatted bed frame for it. But then, my wonderful parents-in-law said they had a slatted frame in their basement that we could have (they really are the most awesome parents-in-law for many reasons that I won't go into :)! They brought the frame over and King Daddy and I put it together and the next day the mattress was delivered. The only thing wrong was the mattress was too short for the frame. So, I built a box spring for it.


If you can imaging a mattress instead of this wood, this is what it looked like. Definitely the mattress was too short! All I did was build a frame using 1"x8" boards cut 78" down the length and 77" across the width. Then I screwed them together. Next, I added a 1"x6" cut 78" down the center and flush with the bottom of the frame. After that I added 1"x6" boards cut 77" across the bottom of the frame. Then, I flipped it over (not the easiest thing I did all day!) Once turned over I added a 1"x4" board cut 78" on top of the center board to create a "T" for the slats to rest on. Next came the side rails. I used a 1"x2" board cut 78" and screwed it in every 8" or so. I didn't want the wood to show so I chose a bright blue canvas to cover it. I just stapled it to the inside of the side and foot of the frame. I didn't do the back, no one is going to see it. I used the slats that came with the bed frame and screwed them down. 


Everything rested on the center support and side rails of the bed frame. Then we just slid the mattress back on (easier said than done!) Now it sits just above the bottom of the headboard. Perfect!

Now on to the rest of the furniture!

Thursday, May 5, 2011

Easy Nightgowns

As you may remember, Queen Sallie sent me some wonderful girlie material not to long ago. I used some of it to make curtains for the cardboard playhouse but there was still a ton left! After giving it some thought I decided to make some nightgowns for the girls. I have made them some before and didn't like how much time and effort they took (we've all been sick here and I have been feeling pretty lazy). So, I scoured the web looking for some ideas. Needless to say, I didn't really find what I was looking for but I found lots of moms out there that were looking for the same thing I was! I knew I wanted to make sleeveless ones but that requires an extra piece to be cut for the bodice and like I said I was being lazy. What to do... Then I was in Wal-Mart and found tank tops for $2.50 each....SCORE! I got several for each of the princesses and here's what I did.


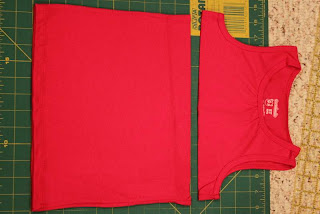
First, I measured the princesses in the back from just below the neck to the length I wanted to use. Then I took the tank top and cut it about 1.5" below the arm hole. 


Then, I cut the material. To get that measurement I took the full length measurement subtracted the length of the cut tank top and then added 1.5". (The 1.5 is the seam and hem allowance I used. If you want to do a proper hem use 1.75" instead of 1.5".) For Princess Little the finished measurement was 23" and the tank top length was 5.5 so the bottom length I needed to cut was: 
23-5.5= 17.5 then 17.5+1.5=19". I cut my material 19" then trimmed the selvage and cut it in half. 

I put the right sides of the material together and sewed the side seams using a 1/2" seam allowance. Then, I pressed the seams open.


Next, using the longest stitch on my machine (a basting stitch) I sewed just the skirt 1/2" around the top. I always start and stop my stitching for hems and such along the side seam where it is less noticeable. I did the same for this but I did not overlap the ends so I could gather it easily. Once the basting stitch was done I held the two strings on the wrong side and pushed the fabric back until it couldn't be gathered any more.


Then, I tucked the tank top in (making sure the right sides of the material were together) and matched the side seams and pinned. 


Then, holding the pinned sides I gently pulled until the skirt and top were the same width. 


Next, I adjusted the gathers until they were evenly spaced across the width and pinned them in place for sewing. Then, I sewed the top and bottom together along the basting stitch.


 After removing the pins, I put a large zig zag stitch inside the seam allowance to keep the gathers in place and the raw edges from fraying too much. (I'm beginning to think I should look into a serger.)


Next, I ironed the tank top seam down toward the skirt and ironed the hem. I ironed the hem up about 1" and went around it with a small zig zag stitch. If I were making this for someone else's princess I would finish the hem properly by turning the raw edge under 1/4". Doing that would require me to add 1.75" in my calculation for the skirt cut.


Here's the final product. It was so easy I was able to make one for each of the princesses in under an hour!