Thursday, June 16, 2011

Growth Chart

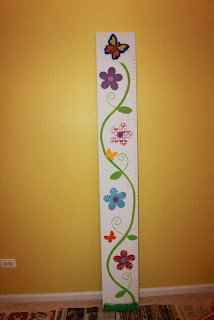
After all the building that I have been doing I have amassed quite a pile of scrap wood in my garage. Since we rent I decided to use a piece to make a growth chart for the Princesses. I had a scrap of 1/4" plywood that was 1'x6'. The perfect size! I sanded it and painted it white (the same white I used in my bedroom makeover. Use what you have, right?)


Once it was dry I got out the craft paint and painted a green vine and leaves with a 1" foam brush.


Next, I used my Silhouette to cut the flowers out of scrap book paper the Princesses picked out. I glued them on using Mod Podge. I didn't, however, seal it with Mod Podge because I didn't know how easy it would be to write on it with a pen.


Then, I painted some round wood pieces that I had in colors to match the flowers. Once they were dry I used a hot glue gun to attach them. I also painted some wooden butterflies and hot glued them on too. Then, I used a small paintbrush to draw the swirls on under the flowers.


The final touch was measuring lines. They don't really show up in this picture but I used a rose pink paint pen and a tape measure. I made the inch lines one inch long and the feet lines two inches long. I also wrote the numbers just to the left of the feet lines with the paint marker.

Now I can't wait to decorate the rest of their room with this flower and butterfly theme!

Finished Quilt

Some of you may remember the post Q is for Quilt. Well, I have finally finished sewing it! I had the front/top all sewn and pinned together for quilting about two weeks after that first post. However, it sat in my sewing room while I tried to decide how to quilt it. This past weekend I finally decided to use stitch in the ditch so that the squares would really stand out. After all the princesses really worked hard on them!


Here it is in all its glory! I'm thinking that Princess Little is going to be my sewer. She was in the sewing room with me through the entire process. You never know, though, Princess Big may surprise me :)

Duvet


The finishing touch for my bedroom makeover was a duvet cover. It was really easy! I used these instructions from Design Sponge. I love it! Now I need to make one for the Princesses.

If you are wondering why you never get a photo of the entire room at once it is because of the icky color on the walls. I'm sure you are thinking "just paint them" but we rent and that is not an option right now. However, if we ever move someplace where the wall color "goes" I'll be sure to show you :)

Dresser Change

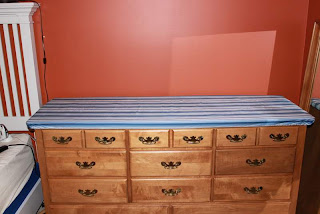
After the end of bed bench I repainted the tall dresser that we had in our room. I also made new drawer pulls for it and here's how it turned out.

End of Bed Bench

I know it has been forever since I last posted anything but I haven't been idle! Here is one of the projects that I have been working on.


It's my end of bed bench! You're probably thinking that the construction might be a little faulty with a sag in the middle, but I assure you it is just that I didn't pull the fabric evenly when I was stapling it to the top. I used the same plans from Ana White that I used for my fabric storage. The measurements are the same, I just added one more cubbie. After this picture was taken and King Daddy sat on it I decided it needed one more leg in the middle so I cut a piece of 1"x4" the same width as the bench, painted it and screwed it in through the inside of the 3rd cubbie.

Even with the fabric problem, which is an easy fix when I have the time, I like the way it turned out.

Monday, May 16, 2011

Drawer Pulls

The next piece of furniture to get a makeover was my bedside table. I started by sanding, priming and painting it white.


This is the original drawer pull. I knew I wanted something different that matched my new blue and white color scheme. After looking at many pulls online I couldn't find one that had a 2" screw placement that I liked and could afford (I have another dresser to do and I want them all to match). I decided I could make my own.


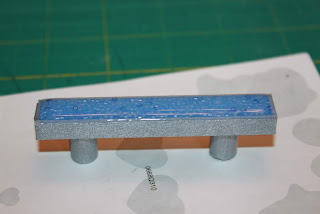
I bought some balsa wood strips from the craft store. I used a 3/16"x3/8" piece that I cut to 3" for the base. For the sides I used a 1/16"x1/4" piece. I cut two small pieces for the ends and then two pieces for the sides. I attached them together with wood glue and let them dry.


Next, I used a 3/8' dowel and using a 1/8" drill bit (this is the size bit to make a pilot hole for a #8 wood screw), made a hole in the center. Then, I cut two pieces 1/2" long. To get the placing correct for gluing them on I screwed them into the drawer, added a little glue and let them dry.


After all the glue was dry I painted it with metallic silver acrylic craft paint and let it dry. Next came the bling. I poured some glass seed beads into the tray and then covered them with some Mod-Podge Dimensional Magic and let it dry.


Once dry I screwed it into place. After that I gave it a try and the pull came off the dowel pieces. Maybe I didn't use enough wood glue. No big deal, I pulled out some super glue and it hasn't come off again! For the price of two pulls I loved online (~$20) I can make 15 pulls!

Dresser Cover

The first piece of furniture to get a makeover was the dresser.


It was the one King Daddy grew up with and his parents had it refinished. Needless to say it holds sentimental memories for King Daddy and he didn't want me to touch it with any paint. In fact he asked me to make a cover for it so it doesn't get scratched. 


The first thing I did was measure the top and cut a piece of fusible fleece. You can find it in the fabric store with all the fusible interfacing and such. Then I measured the top from underneath the overhang across the top and underneath the other overhang (and front to back). To that measurement I added two inches on both the length and width. 


After cutting the fabric I ironed a 1/4" fold then a 3/4" fold and pinned it. Then, by hand, I sewed the corners down. Once that was done, I sewed around the inside edge, leaving a few inches open, to form a casing for the 1/2" elastic.


After sewing the casing I centered the fleece inside it and ironed it to the wrong side of the fabric per the instructions that came with the fleece. 


Once the fleece was on I measured around the dresser and used about 1.5' to 2' less elastic than the measurement. The elastic I had was very stretchy and I wanted the cover to be snug so the drawers wouldn't get caught in it. I pinned a safety pin to the end and pushed it through the casing all the way around. Then, I overlapped the ends about an inch and sewed it together. 


Once I got the elastic all spread out evenly I sewed the opening closed and slipped it on the dresser. It turned out much better than I thought it would. It fits the top perfectly and the drawers don't get caught at all. They also close all the way without getting any cover closed in them. I couldn't be happier and King Daddy thinks it's perfect!

New Bed

Well King Daddy and I finally did it. We got ourselves a new king size bed! We've been talking about for quite a while now and we finally saved up enough money to do it. We went with an organic natural latex mattress that requires a special kind of box spring or a slat bed frame. We didn't get the box spring because originally I was going to build a slatted bed frame for it. But then, my wonderful parents-in-law said they had a slatted frame in their basement that we could have (they really are the most awesome parents-in-law for many reasons that I won't go into :)! They brought the frame over and King Daddy and I put it together and the next day the mattress was delivered. The only thing wrong was the mattress was too short for the frame. So, I built a box spring for it.


If you can imaging a mattress instead of this wood, this is what it looked like. Definitely the mattress was too short! All I did was build a frame using 1"x8" boards cut 78" down the length and 77" across the width. Then I screwed them together. Next, I added a 1"x6" cut 78" down the center and flush with the bottom of the frame. After that I added 1"x6" boards cut 77" across the bottom of the frame. Then, I flipped it over (not the easiest thing I did all day!) Once turned over I added a 1"x4" board cut 78" on top of the center board to create a "T" for the slats to rest on. Next came the side rails. I used a 1"x2" board cut 78" and screwed it in every 8" or so. I didn't want the wood to show so I chose a bright blue canvas to cover it. I just stapled it to the inside of the side and foot of the frame. I didn't do the back, no one is going to see it. I used the slats that came with the bed frame and screwed them down. 


Everything rested on the center support and side rails of the bed frame. Then we just slid the mattress back on (easier said than done!) Now it sits just above the bottom of the headboard. Perfect!

Now on to the rest of the furniture!

Thursday, May 5, 2011

Easy Nightgowns

As you may remember, Queen Sallie sent me some wonderful girlie material not to long ago. I used some of it to make curtains for the cardboard playhouse but there was still a ton left! After giving it some thought I decided to make some nightgowns for the girls. I have made them some before and didn't like how much time and effort they took (we've all been sick here and I have been feeling pretty lazy). So, I scoured the web looking for some ideas. Needless to say, I didn't really find what I was looking for but I found lots of moms out there that were looking for the same thing I was! I knew I wanted to make sleeveless ones but that requires an extra piece to be cut for the bodice and like I said I was being lazy. What to do... Then I was in Wal-Mart and found tank tops for $2.50 each....SCORE! I got several for each of the princesses and here's what I did.


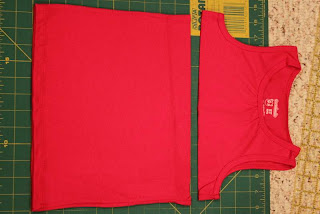
First, I measured the princesses in the back from just below the neck to the length I wanted to use. Then I took the tank top and cut it about 1.5" below the arm hole. 


Then, I cut the material. To get that measurement I took the full length measurement subtracted the length of the cut tank top and then added 1.5". (The 1.5 is the seam and hem allowance I used. If you want to do a proper hem use 1.75" instead of 1.5".) For Princess Little the finished measurement was 23" and the tank top length was 5.5 so the bottom length I needed to cut was: 
23-5.5= 17.5 then 17.5+1.5=19". I cut my material 19" then trimmed the selvage and cut it in half. 

I put the right sides of the material together and sewed the side seams using a 1/2" seam allowance. Then, I pressed the seams open.


Next, using the longest stitch on my machine (a basting stitch) I sewed just the skirt 1/2" around the top. I always start and stop my stitching for hems and such along the side seam where it is less noticeable. I did the same for this but I did not overlap the ends so I could gather it easily. Once the basting stitch was done I held the two strings on the wrong side and pushed the fabric back until it couldn't be gathered any more.


Then, I tucked the tank top in (making sure the right sides of the material were together) and matched the side seams and pinned. 


Then, holding the pinned sides I gently pulled until the skirt and top were the same width. 


Next, I adjusted the gathers until they were evenly spaced across the width and pinned them in place for sewing. Then, I sewed the top and bottom together along the basting stitch.


 After removing the pins, I put a large zig zag stitch inside the seam allowance to keep the gathers in place and the raw edges from fraying too much. (I'm beginning to think I should look into a serger.)


Next, I ironed the tank top seam down toward the skirt and ironed the hem. I ironed the hem up about 1" and went around it with a small zig zag stitch. If I were making this for someone else's princess I would finish the hem properly by turning the raw edge under 1/4". Doing that would require me to add 1.75" in my calculation for the skirt cut.


Here's the final product. It was so easy I was able to make one for each of the princesses in under an hour!

Friday, April 22, 2011

Confetti Eggs

When I was a kid my mom used to make confetti eggs for the Easter bunny to hide with the hardboiled eggs. It was, by far, my favorite thing about Easter (I'm not really a fan of Easter candy)! Here is how to make some for your kids.


First, take a raw egg and wash and dry it with soap and water. Next, with a pointed knife chip a hole in the shell. Try not to get shell in the hole. Once I get my hole started I stick the tip of the knife in it and pull up taking small pieces until the hole is large enough. (Can you tell that we have been dying eggs already?)


Then, turn the egg over, over a bowl, and chip a hole in the other side. This one doesn't have to be as big. Next, blow through the hole (this is why you washed with soap and water) you just made until the egg falls in the bowl. Then, I rinse the egg out by pouring a little soapy water in through the big hole while keeping my finger over the little hole. Then, I put my thumb over the big hole and give it a little shake. Next, remove your fingers from the holes and let the soapy water drain out. Then, rinse with water and prop it up on a paper towel and let dry. Since I don't want to waste the egg I do this over a few days when I make scrambled eggs for breakfast. Because I do it this way they don't get decorated until I have all the egg shells I intend to use. My mom just left them undecorated but I like the challenge of deciding which ones are the confetti eggs (they're lighter than hardboiled ones). This year I colored them using this method from Pink and Green Mama. I just put a small piece of tape over the holes so the color didn't get inside. Last year I put tape over the holes and put them in the same dye cups I used for the hardboiled eggs but they float so I had to figure out how to weigh them down. This year's method worked much better.


Once I had the egg shells decorated I glued a square of tissue paper over the small hole.


Then, through the larger hole, I stuck paper confetti in. This part takes a little patience. If you make your hole large enough you can use a funnel and pour the confetti in, however, I always get the confetti stuck in the funnel. I find it easier to just gently push small pinches in.


Once you have the shell filled glue another square of tissue paper over the large hole and you're finished! When your kids find them they can surprise each other by breaking them on each other. Just a tip though, it can hurt when these get broken on heads! My rule for the princesses is that you break them against shoulders only. When they're older they will be able to crush them in their hands over each others heads.

Crafting For Charity

A couple of months ago Queen Sallie turned me on to a blog called Craft Hope just as they were finishing their current campaign. I have been eagerly waiting for the next one to start and it finally did! Well, after reading this post from I can teach my child I decided my princesses are getting old enough to learn it's not all about them and the Craft Hope project was a perfect fit. We started by discussing the orphans in Russia and other places around the world and here in the USA. First, I gave them a definition for the word orphan. Because I'm not ready for them to think about King Daddy and I dying, I explained that sometimes mommies and daddies can't make enough money to take care of their children so they give them to the orphanage so that they will have enough to eat, a place to sleep and clothes to wear. Now, I realize that this isn't always the case but please remember that this discussion is for a 3.5 and 5 year old and they don't need to know the entire ugly truth, yet. After our talk we went to the craft store to get some supplies.


We got some 2mm elastic cord that is rainbow colored and a 1lb container of pony beads.


Once we got home I tied a piece of yarn to a large wooded bead, both out of our stash. Then, I taped the end so that the yarn wouldn't unravel with repeated use.


Then, I gave them the supplies and let them go to town. Princess Big was all about the patterns. Princess Little just strung whatever she picked up next.


Once their string was full they brought it to me and I transfered it to the elastic cord and tied it in a knot. This activity kept them busy for about 2 hours! I don't know about your little ones but in this house it's unheard of.


When King Daddy got home from work I explained what we were doing and what we had discussed. He was so proud of his princesses that he decided to get in on it too :)

I am planning on making some fabric bracelets too. When I do I'll be sure to do a post so keep your eye out.

Thursday, April 14, 2011

Silhouettes

When making the benches for my fabric storage I ended up with two scrap boards that were about 12" X 10". Instead of letting them take up space in the garage I decided to use them for a piece of art. 


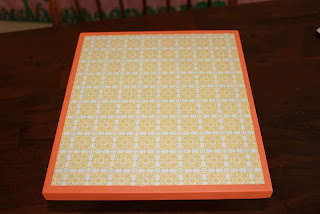
Before collecting my other supplies I sanded the wood. I started with a course (60) grit and went over both flat sides and all four edges. Then, I moved on to a finer (100) grit. Then, a finer (150) grit and finally the finest (220) grit that I had. Next, I chose the scrapbook paper I wanted to use. Once the paper was chosen, I picked a coordinating color of acrylic craft paint and painted the edges and about 1" of the flat surface.


After that, I traced the wood on the front of the paper. Using the tracing I cut the paper about 3/8" smaller on all four sides. Then, I used Mod Podge to glue it to the board. You can see how I ended up with an orange frame around the paper. You could make it larger, smaller or none at all if you want. Once it dried I gave the entire thing (except the back) two coats of Mod Podge and let it dry.


While the boards were drying I snapped these pictures of the princesses in profile and printed them out on regular copy paper in 8" X 10".


Next, I cut out just the head making sure I got as much of the detail as I could. After that I scanned them back into my computer. I put them on the tray with the back/white side down and put a piece of black paper on top. This way I could move it into my Silhouette cutting machine. After getting all the cut lines set I cut the silhouettes out of black adhesive vinyl. If you don't have one just print your picture on a piece of cardstock and cut it out to use as a template. You may need to enlarge or reduce it to get the right size. Once your template is set just trace it onto a piece of black paper or a sheet of vinyl that you can buy at the craft store near the cutting machine accessories. 


Once the Mod Podge was dry I stuck the vinyl silhouettes on. They turned out better than I thought! The vinyl  was surprisingly easy to work with and I can't wait to do more with it. 

Fabric Storage

When we moved from Texas, 4 years ago this summer, my fabric stash wouldn't fit in the truck. King Daddy asked if it was okay to give it away. I didn't really want to but I didn't have much of a choice. I agreed but told him he was going to pay for it. He thought I meant emotionally but actually I meant monetarily. I seriously had over $1000 of fabric in that stash! Over the last 4 years I have slowly been accumulating more fabric and it is time to store it in a way that I can see what I have. King Daddy isn't sure he agrees but it will actually save him money. I won't be buying fabric if I already have some that works!


Here is the mess that I started with. I had fabric stashed in several different boxes. I couldn't see everything and I didn't want to go through each box to see what I had. It is really so much easier just to buy more ;)


I started by making two benches like this. When the Princesses are older I intend to put an upholstered top on it and use it as maybe an end of bed bench. Anyway, I digress. I used this plan by Ana White as my guide. I only used step one and two and I changed the measurements a little. Each cubbie is about 16" X 11".  Then I used this plan by Ana White as my guide to make a 16 cubbie shelf system. Again I changed the measurements a little. I used 8" boards and my cubbies are about
 8" X 8".


Here is the finished product. All my fabric is now clearly visible. I love it!